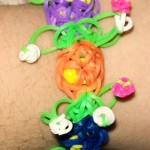
Easter´s step is near and are you interested in making some Easter crafts by your own? Here we presente you with the idea of Easter bracelet which helps your wrist looks more attractive!
Bracelet is one of the most welcomed daily decorations welcomed by people despite the age difference; in shops there are numbers of different styles´ bracelets. However, as for this year, have you ever thought about making an unique one by your own? When this art work is finished, you can also use it as a cute Easer present for your relatives and friends, shall be a nice idea!
Discover more Easter crafts here on Handspire!
Instruction from Aokcorral
Easter bracelet
Por Publicado: March 18, 2014
Make your own version of an Easter bracelet!
Materials
- Sculpey III Modeling Compound
- 7 - 7 mm Jump Rings - Silver
- 7 - E Connectors - Silver
- 2 mm Black Cord
- Silver Findings Set
- Acrylic Paint & Brushes
- Varnish
- knife
- Needle
- Pliers - Needle Nose
- Charm Patterns
Instructions
- 1. Using the pliers, open a jump ring. Insert the ring through the hole in the charm.
- 2. Before closing the ring back up, slip an e connector onto the jump ring. Now, close the jump ring ends with your pliers. Repeat the previous steps for each of the charms.
- 3. Cut a piece of black cord the desired length for your bracelet. (No shorter than 7 inches.) Slip the charms onto the black cord through the other side of the e connector in the following order: Star, Bread, Fish, Heart, Cross, Stone, Butterfly. Finish the ends of the bracelet with the silver findings as shown.
 4. Position the end Charms (Star and Butterfly) 1/2 inch from the findings.
Using the pliers, squeeze the e connector loop into the black cord at the 1/2 inch position.
4. Position the end Charms (Star and Butterfly) 1/2 inch from the findings.
Using the pliers, squeeze the e connector loop into the black cord at the 1/2 inch position.- 5. Space out each of the other charms evenly across the black cord. (for a 7 inch cord that is about 3/4 inch space between charms.) Use the pliers as you did for the Star and Butterfly to set the charms into their positions on the black cord.
- Dificultad: Moderate